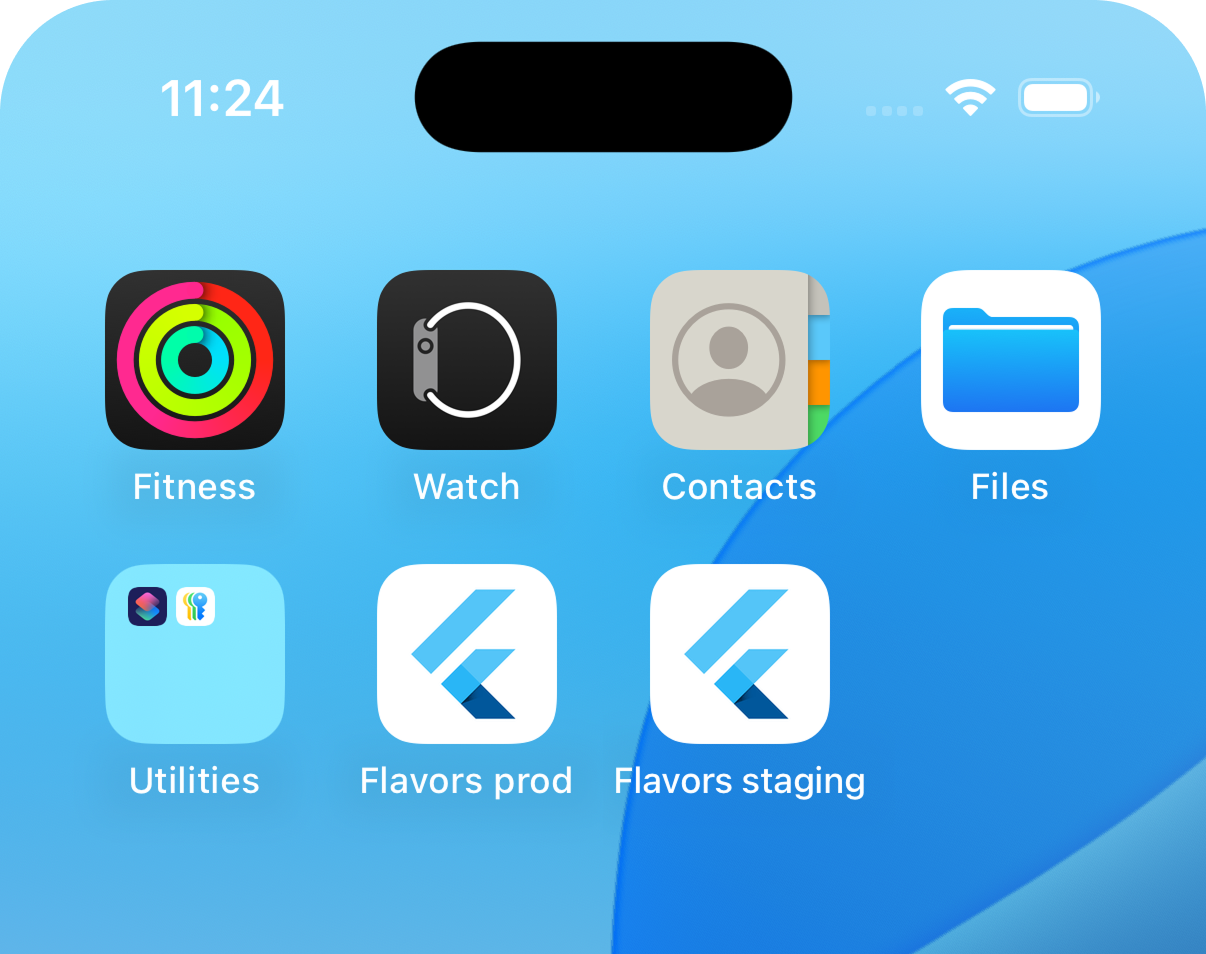
 The following steps show how to add distinct app display
names in Xcode for two schemes called `staging` and
`production` in a project called `flavors_example`.
以下步骤说明如何在名为 `flavors_example` 的项目中,为 `staging` 和 `production` 两个 scheme 在 Xcode 中添加不同的应用显示名称。
1. Create user-defined settings in Xcode:
在 Xcode 中创建用户自定义设置:
* Open the **project navigator**
(**View > Navigators > Project**).
打开 **project navigator**(**View > Navigators > Project**)。
* In the **project navigator**, at the top, select
**Runner**.
在 **project navigator** 顶部选择 **Runner**。
* In the main window under **TARGETS**, select
**Runner**.
在主窗口的 **TARGETS** 下选择 **Runner**。
* Open the **Build Settings** tab.
打开 **Build Settings** tab。
* To the left of the Basic tab, click **+** and select
**Add User-Defined Setting**.
在 Basic tab 左侧,点击 **+** 并选择 **Add User-Defined Setting**。
* Create a setting named `APP_DISPLAY_NAME`.
创建一个名为 `APP_DISPLAY_NAME` 的设置。
* Expand the **APP_DISPLAY_NAME** setting.
展开 **APP_DISPLAY_NAME** 设置。
* Assign the following values to the following keys:
为以下键分配对应的值:
* **Debug-production**: `Flavors prod`
* **Debug-staging**: `Flavors staging`
* **Profile-production**: `Flavors prod`
* **Profile-staging**: `Flavors staging`
* **Release-production**: `Flavors prod`
* **Release-staging**: `Flavors staging`
1. Update `Info.plist` in Xcode:
在 Xcode 中更新 `Info.plist`:
* In the project navigator, select
**Runner > Runner > Info** to open
`flavor_test/ios/Runner/Info.plist`.
在项目导航器中,选择 **Runner > Runner > Info** 以打开
`flavor_test/ios/Runner/Info.plist`。
* Under **Information Property List**, find the
following key and update the value for it:
在 **Information Property List** 下,找到以下键并更新其值:
* **Key**: `CFBundleDisplayName`
* **Value**: `$(APP_DISPLAY_NAME)`
1. Launch the app for each scheme (`staging`, `production`)
and check to make sure that the app display name has
changed for each. To launch a scheme, see the steps in
[Launch an Xcode scheme][].
为每个 scheme(`staging`、`production`)启动应用,确认每个 scheme 的应用显示名称都已改变。
要启动某个 scheme,请参阅 [启动 Xcode scheme][Launch an Xcode scheme] 中的步骤。
[Launch an Xcode scheme]: #launch-an-xcode-scheme
### Create distinct icons
### 创建不同的图标
If you have multiple schemes, a distinct icon for each
configuration can help you quickly identify which scheme
your deployed app is using.
若有多个 scheme,为各配置使用不同图标有助于快速识别已部署应用使用的 scheme。
The following steps show how to add distinct app display
names in Xcode for two schemes called `staging` and
`production` in a project called `flavors_example`.
以下步骤说明如何在名为 `flavors_example` 的项目中,为 `staging` 和 `production` 两个 scheme 在 Xcode 中添加不同的应用显示名称。
1. Create user-defined settings in Xcode:
在 Xcode 中创建用户自定义设置:
* Open the **project navigator**
(**View > Navigators > Project**).
打开 **project navigator**(**View > Navigators > Project**)。
* In the **project navigator**, at the top, select
**Runner**.
在 **project navigator** 顶部选择 **Runner**。
* In the main window under **TARGETS**, select
**Runner**.
在主窗口的 **TARGETS** 下选择 **Runner**。
* Open the **Build Settings** tab.
打开 **Build Settings** tab。
* To the left of the Basic tab, click **+** and select
**Add User-Defined Setting**.
在 Basic tab 左侧,点击 **+** 并选择 **Add User-Defined Setting**。
* Create a setting named `APP_DISPLAY_NAME`.
创建一个名为 `APP_DISPLAY_NAME` 的设置。
* Expand the **APP_DISPLAY_NAME** setting.
展开 **APP_DISPLAY_NAME** 设置。
* Assign the following values to the following keys:
为以下键分配对应的值:
* **Debug-production**: `Flavors prod`
* **Debug-staging**: `Flavors staging`
* **Profile-production**: `Flavors prod`
* **Profile-staging**: `Flavors staging`
* **Release-production**: `Flavors prod`
* **Release-staging**: `Flavors staging`
1. Update `Info.plist` in Xcode:
在 Xcode 中更新 `Info.plist`:
* In the project navigator, select
**Runner > Runner > Info** to open
`flavor_test/ios/Runner/Info.plist`.
在项目导航器中,选择 **Runner > Runner > Info** 以打开
`flavor_test/ios/Runner/Info.plist`。
* Under **Information Property List**, find the
following key and update the value for it:
在 **Information Property List** 下,找到以下键并更新其值:
* **Key**: `CFBundleDisplayName`
* **Value**: `$(APP_DISPLAY_NAME)`
1. Launch the app for each scheme (`staging`, `production`)
and check to make sure that the app display name has
changed for each. To launch a scheme, see the steps in
[Launch an Xcode scheme][].
为每个 scheme(`staging`、`production`)启动应用,确认每个 scheme 的应用显示名称都已改变。
要启动某个 scheme,请参阅 [启动 Xcode scheme][Launch an Xcode scheme] 中的步骤。
[Launch an Xcode scheme]: #launch-an-xcode-scheme
### Create distinct icons
### 创建不同的图标
If you have multiple schemes, a distinct icon for each
configuration can help you quickly identify which scheme
your deployed app is using.
若有多个 scheme,为各配置使用不同图标有助于快速识别已部署应用使用的 scheme。
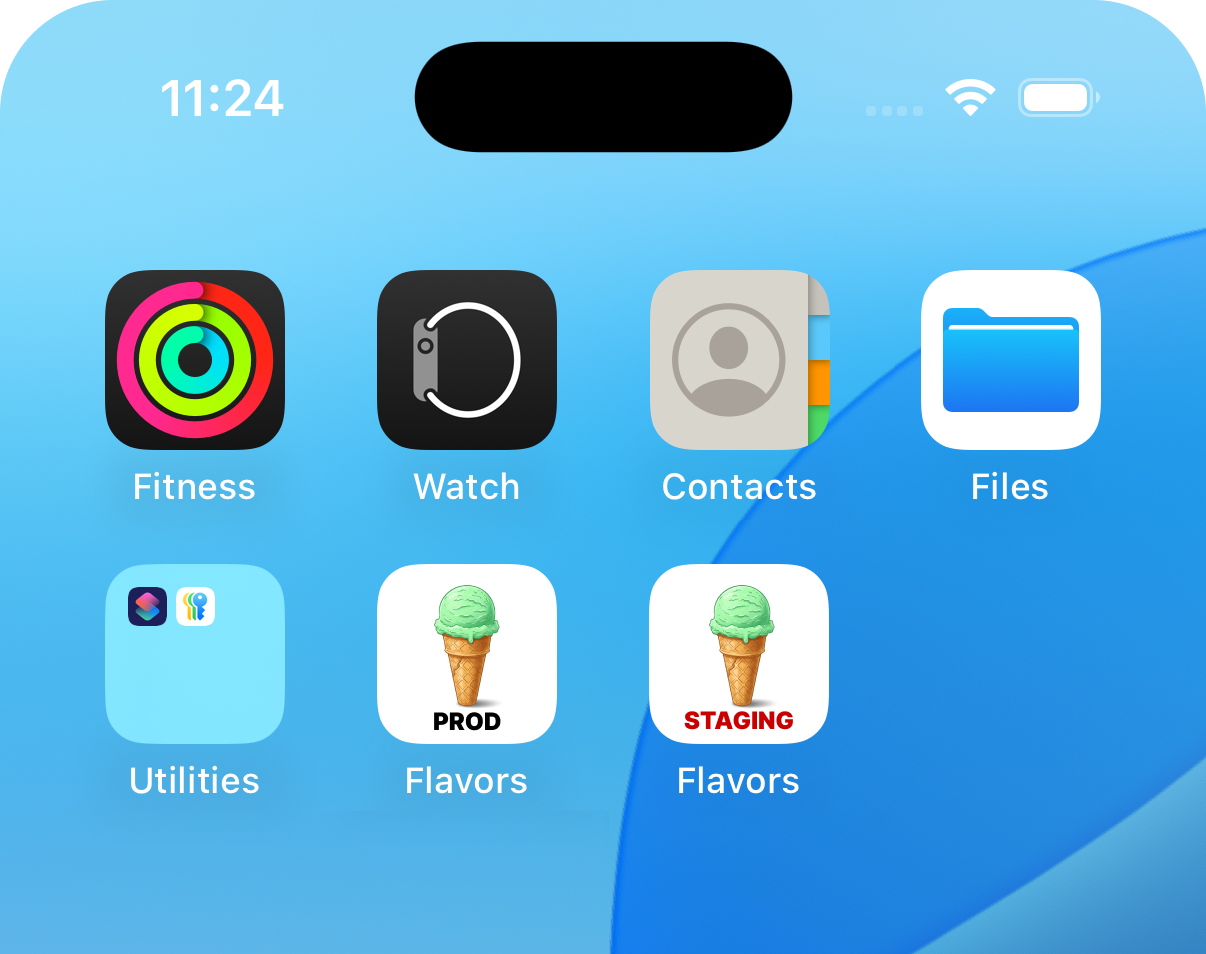 The following steps show how to add a distinct icon in
Xcode for two schemes called `staging` and `production` in
an iOS project called `flavors_example`.
以下步骤说明如何在名为 `flavors_example` 的 iOS 项目中,为 `staging` 和 `production` 两个 scheme 在 Xcode 中添加不同图标。
1. Prepare your icons:
准备你的图标:
* Design your staging icon and production icon in the
design tool of your choice.
用你喜欢的设计工具设计 staging 图标和 production 图标。
* Generate versions of the staging icon and production
icon in the sizes that you need. Save them in
PNG format.
生成你所需尺寸的 staging 图标和 production 图标,并以 PNG 格式保存。
:::note
You can use a tool like [App Icon Generator][]
to generate the versions of your icons.
可使用 [App Icon Generator][] 等工具生成各尺寸图标。
:::
1. Add the icons to your Xcode project:
将图标添加到你的 Xcode 项目:
* Open the **project navigator**
(**View > Navigators > Project**).
打开 **project navigator**(**View > Navigators > Project**)。
* In the **project navigator**, select
**Runner > Runner > Assets** to open the
**Assets** window.
在 **project navigator** 中,选择 **Runner > Runner > Assets** 以打开
**Assets** 窗口。
* Complete the following steps for the staging icon:
对 staging 图标完成以下步骤:
* Click **+ > iOS > iOS App icon**.
点击 **+ > iOS > iOS App icon**。
* Name the icon `AppIcon-staging`.
将图标命名为 `AppIcon-staging`。
* Drag your staging icons into the
**AppIcon-staging** window and make sure the icons
are assigned to the correct sizes.
将你的 staging 图标拖入 **AppIcon-staging** 窗口,
并确保这些图标已分配到正确的尺寸。
* Repeat the previous step for the production icon.
对 production 图标重复上一步骤。
1. Connect the icons to your schemes:
将图标关联到你的 scheme:
* Open the **project navigator**.
打开 **project navigator**。
* In the main window under **TARGETS**, select
**Runner**.
在主窗口的 **TARGETS** 下选择 **Runner**。
* Open the **General** tab if it's not already open.
若 **General** tab 尚未打开,请将其打开。
* Go to the **Apps Icons and Launch Screen** section and
expand it.
进入 **Apps Icons and Launch Screen** 部分并展开它。
* To the right of the **App icon** field, click
**+** and update the fields as follows:
在 **App icon** 字段右侧,点击 **+** 并按如下方式更新各字段:
* **Debug-staging**: `AppIcon-staging`
* **Profile-staging**: `AppIcon-staging`
* **Release-staging**: `AppIcon-staging`
* **Debug-production**: `AppIcon-production`
* **Profile-production**: `AppIcon-production`
* **Release-production**: `AppIcon-production`
1. Launch the app for each scheme (`staging`, `production`)
and check to make sure that the app icon has
changed for each. To launch a scheme, see the steps in
[Launch an Xcode scheme][].
为每个 scheme(`staging`、`production`)启动应用,确认每个 scheme 的应用图标都已改变。
要启动某个 scheme,请参阅 [启动 Xcode scheme][Launch an Xcode scheme] 中的步骤。
[Launch an Xcode scheme]: #launch-an-xcode-scheme
[App Icon Generator]: https://www.appicon.co/
### Add distinct bundle identifiers
### 添加不同的 bundle identifier
A bundle identifier is a unique identifier for your
application on Apple's platforms. If you are using multiple
Xcode schemes as Flutter flavors, you can have Apple treat
each scheme as a separate application. To do this, you need
to assign a different bundle identifier to each scheme.
This allows you to test new features or bug fixes in one
version of the app (for example `staging`) without affecting
another version of the app (for example, `production`).
bundle identifier 是应用在 Apple 平台上的唯一标识。
若将多个 Xcode scheme 用作 Flutter flavor,
可让 Apple 将每个 scheme 视为独立应用,
需为每个 scheme 分配不同的 bundle identifier,
这样可在某一版本(如 `staging`)测试新功能或修复而不影响另一版本(如 `production`)。
The following steps show how to set a unique
bundle identifier for two Xcode schemes called `staging`
and `production` in an iOS project called `flavors_example`.
以下步骤说明如何在名为 `flavors_example` 的 iOS 项目中
为 `staging` 和 `production` 两个 Xcode scheme 设置唯一的 bundle identifier。
1. In Xcode, open the **project navigator**
(**View > Navigators > Project**).
在 Xcode 中打开 **project navigator**(**View > Navigators > Project**)。
1. In the main window under **TARGETS**, select
**Runner**.
在主窗口的 **TARGETS** 下选择 **Runner**。
1. Open the **Build Settings** tab.
打开 **Build Settings** tab。
1. Navigate to the **Packaging** section.
进入 **Packaging** 部分。
1. Expand the **Product Bundle Identifier** setting to
see the different build configurations.
展开 **Product Bundle Identifier** 设置,查看不同的构建配置。
1. For each scheme's build configuration, set the
desired bundle identifier. For example:
为每个 scheme 的构建配置设置所需的 bundle identifier。例如:
* Debug-staging, Profile-staging, Release-staging:
`com.example.flavorsExample.staging`
* Debug, Profile, Release, Debug-production,
Profile-production, Release-production:
`com.example.flavorsExample`
1. Ensure that these bundle identifiers are included in
your App ID and your App ID is [registered in your Apple Developer account][].
确保这些 bundle identifier 已包含在你的 App ID 中,并且你的 App ID 已
[在你的 Apple Developer 账号中注册][registered in your Apple Developer account]。
[registered in your Apple Developer account]: https://developer.apple.com/help/account/identifiers/register-an-app-id/
### Bundle assets
### 打包资源
If you have assets that are only used in a specific flavor
in your app, you can configure them to only be bundled into
your app when launching that flavor. This prevents your
app bundle size from being bloated by unused assets. To
bundle assets for each flavor, add the `flavors` subfield
to the `assets` field in your project's pubspec. To learn
more, see the [`assets` field][] in
[Flutter pubspec options][].
若资源仅在应用的特定 flavor 中使用,可配置为仅在该 flavor 启动时打包,避免未使用资源增大包体积。为每个 flavor 打包资源,请在项目 pubspec 的 `assets` 字段添加 `flavors` 子字段。详见 [Flutter pubspec options][] 中的 [`assets` field][]。
[`assets` field]: /tools/pubspec#assets
[Flutter pubspec options]: /tools/pubspec
### Update Podfiles
### 更新 Podfile
If you are creating new Xcode schemes for a Flutter iOS
project and you have an iOS Podfile in an existing
Flutter project, you must update the Flutter iOS Podfile to
match the changes you made in Xcode.
若为 Flutter iOS 项目创建新 Xcode scheme 且现有 Flutter 项目有 iOS Podfile,必须更新 Flutter iOS Podfile 以匹配 Xcode 中的更改。
The following steps show how to update your iOS Podfile to
include two new Xcode schemes called `staging` and
`production` in a Flutter project called `flavors_example`.
You can also use these steps to update a macOS
project by replacing any reference to `iOS` with `macOS`.
以下步骤说明如何在名为 `flavors_example` 的 Flutter 项目中
更新 iOS Podfile 以包含 `staging` 和 `production` 两个新 Xcode scheme。
将 `iOS` 替换为 `macOS` 也可用于 macOS 项目。
1. In your IDE, open the `ios/Podfile` file.
在你的 IDE 中打开 `ios/Podfile` 文件。
1. Make the following updates and save your changes.
做出以下更新并保存改动。
```ruby title="flavors_example/ios/Podfile"
project 'Runner', {
...
'Debug' => :debug,
'Debug-staging' => :debug,
'Debug-production' => :debug,
'Profile' => :release,
'Profile-staging' => :release,
'Profile-production' => :release,
'Release' => :release,
'Release-staging' => :release,
'Release-production' => :release,
...
```
### Add unique build settings
### 添加唯一构建设置
You can use [build settings][] to govern your iOS build
process from compilation and linking to debugging and
distribution. One way that you can use build settings
with Flutter flavors is to assign those build settings
to Xcode build configurations. For example, you might want
to assign different API URLs to `Debug-staging` and
`Debug-production`. For example:
可使用 [build settings][](构建设置)管理从编译、链接到调试和分发的 iOS 构建流程。
将构建设置用于 Flutter flavor 的一种方式是为 Xcode 构建配置分配这些设置,
例如为 `Debug-staging` 和 `Debug-production` 分配不同的 API URL。例如:
```plaintext title="debug-staging-settings.xcconfig"
# Debug-staging build settings
API_BASE_URL = staging.flavors.com/api
```
```plaintext title="debug-production-settings.xcconfig"
# Debug-production build settings
API_BASE_URL = flavors.com/api
```
If you would like to add additional build settings for
a specific build configuration, see Apple's
[Adding a build configuration file to your project][].
若要为特定构建配置添加更多构建设置,
请参阅 Apple 的 [Adding a build configuration file to your project][](向项目添加构建配置文件)。
[build settings]: https://developer.apple.com/documentation/xcode/build-settings-reference/
[Adding a build configuration file to your project]: https://developer.apple.com/documentation/xcode/adding-a-build-configuration-file-to-your-project
### Add additional customizations
### 添加更多自定义项
This document contains a few common Xcode scheme
configurations, but there are many more that you can apply.
To learn about them, see
[Customizing the build schemes for a project][].
本文档包含若干常见 Xcode scheme 配置,还可应用更多配置。
详见 [Customizing the build schemes for a project][](自定义项目的构建 scheme)。
[Customizing the build schemes for a project]: https://developer.apple.com/documentation/xcode/customizing-the-build-schemes-for-a-project
## More information
## 更多信息
For more information on creating and using flavors, check
out the following resources:
有关创建和使用 flavor 的更多信息,请参阅以下资源:
* [How to set up Flutter & Firebase with Multiple Flavors
using the FlutterFire CLI][flutterfire-cli]
[使用 FlutterFire CLI 配置多 Flavor 的 Flutter 与 Firebase][flutterfire-cli]
* [Build flavors in Flutter (Android and iOS) with different
Firebase projects per flavor Flutter Ready to Go][flavors-firebase]
[Flutter 中按 flavor 使用不同 Firebase 项目的构建 flavor(Android 与 iOS)][flavors-firebase]
[flutterfire-cli]: https://codewithandrea.com/articles/flutter-firebase-multiple-flavors-flutterfire-cli/
[flavors-firebase]: https://medium.com/@animeshjain/build-flavors-in-flutter-android-and-ios-with-different-firebase-projects-per-flavor-27c5c5dac10b
The following steps show how to add a distinct icon in
Xcode for two schemes called `staging` and `production` in
an iOS project called `flavors_example`.
以下步骤说明如何在名为 `flavors_example` 的 iOS 项目中,为 `staging` 和 `production` 两个 scheme 在 Xcode 中添加不同图标。
1. Prepare your icons:
准备你的图标:
* Design your staging icon and production icon in the
design tool of your choice.
用你喜欢的设计工具设计 staging 图标和 production 图标。
* Generate versions of the staging icon and production
icon in the sizes that you need. Save them in
PNG format.
生成你所需尺寸的 staging 图标和 production 图标,并以 PNG 格式保存。
:::note
You can use a tool like [App Icon Generator][]
to generate the versions of your icons.
可使用 [App Icon Generator][] 等工具生成各尺寸图标。
:::
1. Add the icons to your Xcode project:
将图标添加到你的 Xcode 项目:
* Open the **project navigator**
(**View > Navigators > Project**).
打开 **project navigator**(**View > Navigators > Project**)。
* In the **project navigator**, select
**Runner > Runner > Assets** to open the
**Assets** window.
在 **project navigator** 中,选择 **Runner > Runner > Assets** 以打开
**Assets** 窗口。
* Complete the following steps for the staging icon:
对 staging 图标完成以下步骤:
* Click **+ > iOS > iOS App icon**.
点击 **+ > iOS > iOS App icon**。
* Name the icon `AppIcon-staging`.
将图标命名为 `AppIcon-staging`。
* Drag your staging icons into the
**AppIcon-staging** window and make sure the icons
are assigned to the correct sizes.
将你的 staging 图标拖入 **AppIcon-staging** 窗口,
并确保这些图标已分配到正确的尺寸。
* Repeat the previous step for the production icon.
对 production 图标重复上一步骤。
1. Connect the icons to your schemes:
将图标关联到你的 scheme:
* Open the **project navigator**.
打开 **project navigator**。
* In the main window under **TARGETS**, select
**Runner**.
在主窗口的 **TARGETS** 下选择 **Runner**。
* Open the **General** tab if it's not already open.
若 **General** tab 尚未打开,请将其打开。
* Go to the **Apps Icons and Launch Screen** section and
expand it.
进入 **Apps Icons and Launch Screen** 部分并展开它。
* To the right of the **App icon** field, click
**+** and update the fields as follows:
在 **App icon** 字段右侧,点击 **+** 并按如下方式更新各字段:
* **Debug-staging**: `AppIcon-staging`
* **Profile-staging**: `AppIcon-staging`
* **Release-staging**: `AppIcon-staging`
* **Debug-production**: `AppIcon-production`
* **Profile-production**: `AppIcon-production`
* **Release-production**: `AppIcon-production`
1. Launch the app for each scheme (`staging`, `production`)
and check to make sure that the app icon has
changed for each. To launch a scheme, see the steps in
[Launch an Xcode scheme][].
为每个 scheme(`staging`、`production`)启动应用,确认每个 scheme 的应用图标都已改变。
要启动某个 scheme,请参阅 [启动 Xcode scheme][Launch an Xcode scheme] 中的步骤。
[Launch an Xcode scheme]: #launch-an-xcode-scheme
[App Icon Generator]: https://www.appicon.co/
### Add distinct bundle identifiers
### 添加不同的 bundle identifier
A bundle identifier is a unique identifier for your
application on Apple's platforms. If you are using multiple
Xcode schemes as Flutter flavors, you can have Apple treat
each scheme as a separate application. To do this, you need
to assign a different bundle identifier to each scheme.
This allows you to test new features or bug fixes in one
version of the app (for example `staging`) without affecting
another version of the app (for example, `production`).
bundle identifier 是应用在 Apple 平台上的唯一标识。
若将多个 Xcode scheme 用作 Flutter flavor,
可让 Apple 将每个 scheme 视为独立应用,
需为每个 scheme 分配不同的 bundle identifier,
这样可在某一版本(如 `staging`)测试新功能或修复而不影响另一版本(如 `production`)。
The following steps show how to set a unique
bundle identifier for two Xcode schemes called `staging`
and `production` in an iOS project called `flavors_example`.
以下步骤说明如何在名为 `flavors_example` 的 iOS 项目中
为 `staging` 和 `production` 两个 Xcode scheme 设置唯一的 bundle identifier。
1. In Xcode, open the **project navigator**
(**View > Navigators > Project**).
在 Xcode 中打开 **project navigator**(**View > Navigators > Project**)。
1. In the main window under **TARGETS**, select
**Runner**.
在主窗口的 **TARGETS** 下选择 **Runner**。
1. Open the **Build Settings** tab.
打开 **Build Settings** tab。
1. Navigate to the **Packaging** section.
进入 **Packaging** 部分。
1. Expand the **Product Bundle Identifier** setting to
see the different build configurations.
展开 **Product Bundle Identifier** 设置,查看不同的构建配置。
1. For each scheme's build configuration, set the
desired bundle identifier. For example:
为每个 scheme 的构建配置设置所需的 bundle identifier。例如:
* Debug-staging, Profile-staging, Release-staging:
`com.example.flavorsExample.staging`
* Debug, Profile, Release, Debug-production,
Profile-production, Release-production:
`com.example.flavorsExample`
1. Ensure that these bundle identifiers are included in
your App ID and your App ID is [registered in your Apple Developer account][].
确保这些 bundle identifier 已包含在你的 App ID 中,并且你的 App ID 已
[在你的 Apple Developer 账号中注册][registered in your Apple Developer account]。
[registered in your Apple Developer account]: https://developer.apple.com/help/account/identifiers/register-an-app-id/
### Bundle assets
### 打包资源
If you have assets that are only used in a specific flavor
in your app, you can configure them to only be bundled into
your app when launching that flavor. This prevents your
app bundle size from being bloated by unused assets. To
bundle assets for each flavor, add the `flavors` subfield
to the `assets` field in your project's pubspec. To learn
more, see the [`assets` field][] in
[Flutter pubspec options][].
若资源仅在应用的特定 flavor 中使用,可配置为仅在该 flavor 启动时打包,避免未使用资源增大包体积。为每个 flavor 打包资源,请在项目 pubspec 的 `assets` 字段添加 `flavors` 子字段。详见 [Flutter pubspec options][] 中的 [`assets` field][]。
[`assets` field]: /tools/pubspec#assets
[Flutter pubspec options]: /tools/pubspec
### Update Podfiles
### 更新 Podfile
If you are creating new Xcode schemes for a Flutter iOS
project and you have an iOS Podfile in an existing
Flutter project, you must update the Flutter iOS Podfile to
match the changes you made in Xcode.
若为 Flutter iOS 项目创建新 Xcode scheme 且现有 Flutter 项目有 iOS Podfile,必须更新 Flutter iOS Podfile 以匹配 Xcode 中的更改。
The following steps show how to update your iOS Podfile to
include two new Xcode schemes called `staging` and
`production` in a Flutter project called `flavors_example`.
You can also use these steps to update a macOS
project by replacing any reference to `iOS` with `macOS`.
以下步骤说明如何在名为 `flavors_example` 的 Flutter 项目中
更新 iOS Podfile 以包含 `staging` 和 `production` 两个新 Xcode scheme。
将 `iOS` 替换为 `macOS` 也可用于 macOS 项目。
1. In your IDE, open the `ios/Podfile` file.
在你的 IDE 中打开 `ios/Podfile` 文件。
1. Make the following updates and save your changes.
做出以下更新并保存改动。
```ruby title="flavors_example/ios/Podfile"
project 'Runner', {
...
'Debug' => :debug,
'Debug-staging' => :debug,
'Debug-production' => :debug,
'Profile' => :release,
'Profile-staging' => :release,
'Profile-production' => :release,
'Release' => :release,
'Release-staging' => :release,
'Release-production' => :release,
...
```
### Add unique build settings
### 添加唯一构建设置
You can use [build settings][] to govern your iOS build
process from compilation and linking to debugging and
distribution. One way that you can use build settings
with Flutter flavors is to assign those build settings
to Xcode build configurations. For example, you might want
to assign different API URLs to `Debug-staging` and
`Debug-production`. For example:
可使用 [build settings][](构建设置)管理从编译、链接到调试和分发的 iOS 构建流程。
将构建设置用于 Flutter flavor 的一种方式是为 Xcode 构建配置分配这些设置,
例如为 `Debug-staging` 和 `Debug-production` 分配不同的 API URL。例如:
```plaintext title="debug-staging-settings.xcconfig"
# Debug-staging build settings
API_BASE_URL = staging.flavors.com/api
```
```plaintext title="debug-production-settings.xcconfig"
# Debug-production build settings
API_BASE_URL = flavors.com/api
```
If you would like to add additional build settings for
a specific build configuration, see Apple's
[Adding a build configuration file to your project][].
若要为特定构建配置添加更多构建设置,
请参阅 Apple 的 [Adding a build configuration file to your project][](向项目添加构建配置文件)。
[build settings]: https://developer.apple.com/documentation/xcode/build-settings-reference/
[Adding a build configuration file to your project]: https://developer.apple.com/documentation/xcode/adding-a-build-configuration-file-to-your-project
### Add additional customizations
### 添加更多自定义项
This document contains a few common Xcode scheme
configurations, but there are many more that you can apply.
To learn about them, see
[Customizing the build schemes for a project][].
本文档包含若干常见 Xcode scheme 配置,还可应用更多配置。
详见 [Customizing the build schemes for a project][](自定义项目的构建 scheme)。
[Customizing the build schemes for a project]: https://developer.apple.com/documentation/xcode/customizing-the-build-schemes-for-a-project
## More information
## 更多信息
For more information on creating and using flavors, check
out the following resources:
有关创建和使用 flavor 的更多信息,请参阅以下资源:
* [How to set up Flutter & Firebase with Multiple Flavors
using the FlutterFire CLI][flutterfire-cli]
[使用 FlutterFire CLI 配置多 Flavor 的 Flutter 与 Firebase][flutterfire-cli]
* [Build flavors in Flutter (Android and iOS) with different
Firebase projects per flavor Flutter Ready to Go][flavors-firebase]
[Flutter 中按 flavor 使用不同 Firebase 项目的构建 flavor(Android 与 iOS)][flavors-firebase]
[flutterfire-cli]: https://codewithandrea.com/articles/flutter-firebase-multiple-flavors-flutterfire-cli/
[flavors-firebase]: https://medium.com/@animeshjain/build-flavors-in-flutter-android-and-ios-with-different-firebase-projects-per-flavor-27c5c5dac10b