# 构建和发布为 macOS 应用
> 如何在 macOS 的 App Store 上发布一个 Flutter 应用。
This guide provides a step-by-step walkthrough of releasing a
Flutter app to the [App Store][appstore].
本教程将指导开发者如何在 [App Store][appstore] 上发布 Flutter 应用程序。
## Preliminaries
## 预备工作
Before beginning the process of releasing your app,
ensure that it meets
Apple's [App Review Guidelines][appreview].
在开始发布应用程序之前,
请确保它符合苹果的 [应用程序审查指南][appreview]。
In order to publish your app to the App Store,
you must first enroll in the
[Apple Developer Program][devprogram].
You can read more about the various
membership options in Apple's
[Choosing a Membership][devprogram_membership] guide.
为了将应用程序发布到 App Store,
你必须先注册 [苹果开发者计划][devprogram]。
可以在 Apple 的 [选择会员资格][devprogram_membership] 指南中阅读更多关于各种会员资格的信息。
## Register your app on App Store Connect
## 在 App Store Connect 上注册你的应用程序
Manage your app's life cycle on
[App Store Connect][appstoreconnect_login] (formerly iTunes Connect).
You define your app name and description, add screenshots,
set pricing, and manage releases to the App Store and TestFlight.
在 [App Store Connect][appstoreconnect_login](以前叫 iTunes Connect)上管理应用程序的生命周期。
你可以定义应用程序的名称和描述、添加屏幕截图、
设置定价以及管理应用程序商店和 TestFlight 的发布。
Registering your app involves two steps: registering a unique
Bundle ID, and creating an application record on App Store Connect.
注册应用程序包括两个步骤:注册一个唯一的 Bundle ID,
以及在 App Store Connect 上创建应用程序记录。
For a detailed overview of App Store Connect, see the
[App Store Connect][appstoreconnect_guide] guide.
有关 App Store Connect 的详细概述,
请参阅 [App Store Connect 指南][appstoreconnect_guide]。
### Register a Bundle ID
### 注册 Bundle ID
Every macOS application is associated with a Bundle ID,
a unique identifier registered with Apple.
To register a Bundle ID for your app, follow these steps:
每个 macOS 应用程序都与一个 Bundle ID 关联,
Bundle ID 是在 Apple 注册的唯一标识。
要为应用程序注册 Bundle ID,请执行以下步骤:
1. Open the [App IDs][devportal_appids] page of your developer account.
打开开发者帐户的 [App IDs][devportal_appids] 页面。
1. Click **+** to create a new Bundle ID.
点击 **+** 创建一个新的 Bundle ID。
1. Enter an app name, select **Explicit App ID**, and enter an ID.
输入应用程序名称,选择 **显式 App ID**,然后输入 ID。
1. Select the services your app uses, then click **Continue**.
选择应用程序使用的服务,然后点击 **下一步**。
1. On the next page, confirm the details and click **Register**
to register your Bundle ID.
在下一页中,确认应用的详细信息,然后点击 **注册** 来注册你的 Bundle ID。
### Create an application record on App Store Connect
### 在 App Store Connect 上创建应用程序记录
Register your app on App Store Connect:
在 App Store Connect 上注册你的应用程序:
1. Open [App Store Connect][appstoreconnect_login] in your browser.
在浏览器中打开 [App Store Connect][appstoreconnect_login]。
1. On the App Store Connect landing page, click **My Apps**.
在 App Store Connect 登录页上,点击 **我的应用程序**。
1. Click **+** in the top-left corner of the My Apps page,
then select **New App**.
点击我的应用程序页面左上角的 **+**,然后选择 **新建应用程序**。
1. Fill in your app details in the form that appears.
In the Platforms section, ensure that macOS is checked.
Since Flutter does not currently support tvOS,
leave that checkbox unchecked. Click **Create**.
在表单中填写应用程序详细信息。
在平台部分,请确保选中了 macOS。
由于 Flutter 目前不支持 tvOS,所以不要选中该项。点击 **创建**。
1. Navigate to the application details for your app and select
**App Information** from the sidebar.
从侧边栏中选择 **应用程序信息**,可以查看应用程序的详细信息。
1. In the General Information section, select the Bundle ID
you registered in the preceding step.
在常规信息中,选择在上一步中注册的 Bundle ID。
For a detailed overview,
see [Add an app to your account][appstoreconnect_guide_register].
更详细的介绍,请参阅 [将应用程序添加到你的帐户][appstoreconnect_guide_register]]
## Review Xcode project settings
## 检查 Xcode 项目设置
This step covers reviewing the most important settings
in the Xcode workspace.
For detailed procedures and descriptions, see
[Prepare for app distribution][distributionguide_config].
这一步包括检查 Xcode 工作区中最重要的设置。
更详细的过程和说明,请参阅 [准备应用程序分发][distributionguide_config]。
Navigate to your target's settings in Xcode:
在 Xcode 中配置目标:
1. In Xcode, open `Runner.xcworkspace` in your app's `macos` folder.
在 Xcode 中,打开应用程序 `macos` 文件夹中的 `Runner.xcworkspace`。
1. To view your app's settings, select the **Runner** project in the Xcode
project navigator. Then, in the main view sidebar, select the **Runner**
target.
要查看应用程序的设置,请在 Xcode 导航栏中选择 **Runner** 项目。
然后,在主视图侧栏中,选择 **Runner** 目标。
1. Select the **General** tab.
选择 **General(常规)** 选项。
Verify the most important settings.
确认最重要的设置。
In the **Identity** section:
在 **Identity(标识)** 部分:
`App Category`
The app category under which your app will be listed on the Mac App Store. This cannot be none.
`App Category(应用类别)`
你的应用将出现在 Mac App Store 中的哪个类别,此项不能为空。
`Bundle Identifier`
The App ID you registered on App Store Connect.
`Bundle Identifier`
你在 App Store Connect 注册的应用程序 ID。
In the **Deployment info** section:
在 **Deployment info(部署信息)** 部分:
`Deployment Target`
The minimum macOS version that your app supports.
To check which versions of macOS that Flutter supports deploying to,
check out Flutter's [Supported deployment platforms][].
`Deployment Target(部署目标)`
应用程序支持的最低 macOS 版本。
要查看 Flutter 支持部署到哪些版本的 macOS,
请查看 Flutter [支持的部署平台][Supported deployment platforms]。
In the **Signing & Capabilities** section:
在 **Signing & Capabilities(签名和功能)** 部分:
`Automatically manage signing`
Whether Xcode should automatically manage app signing
and provisioning. This is set `true` by default, which should
be sufficient for most apps. For more complex scenarios,
see the [Code Signing Guide][codesigning_guide].
`Automatically manage signing(自动管理签名)`
Xcode 是否自动管理应用程序签名和配置。
默认为 `true`,这对于大多数应用程序来说应该足够。
更复杂的场景,请参阅 [代码签名指南][codesigning_guide]。
`Team`
Select the team associated with your registered Apple Developer
account. If required, select **Add Account...**,
then update this setting.
`Team(团队)`
选择与你注册的 Apple 开发者帐户关联的团队。
如果需要,请选择 **Add Account...(添加账户...)**,然后更新此设置。
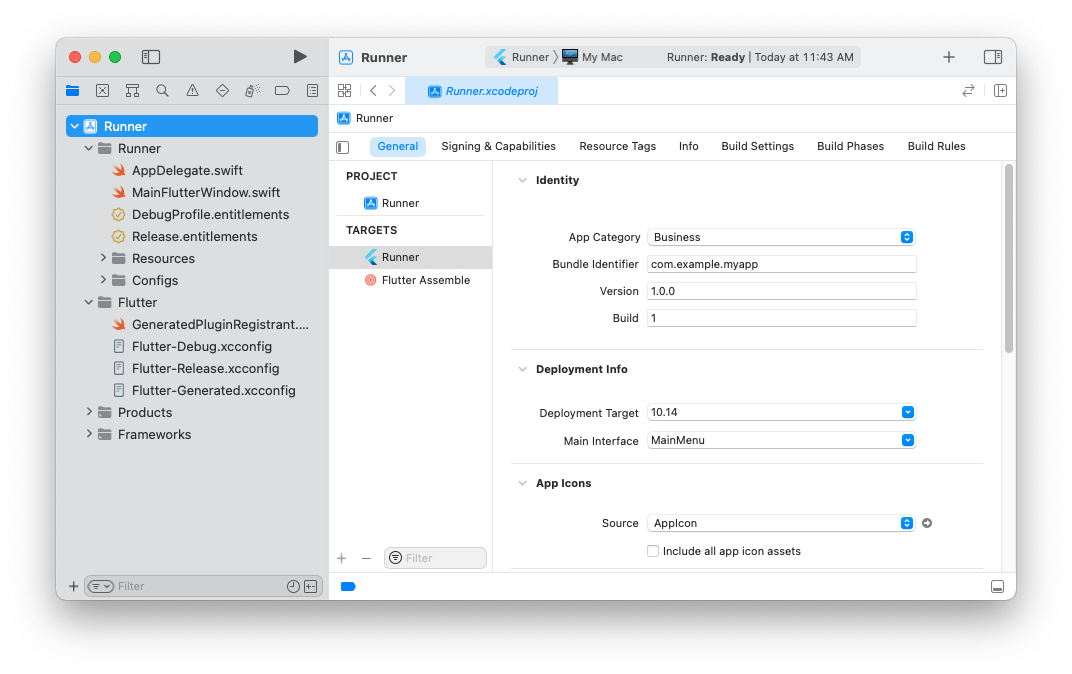
The **General** tab of your project settings should resemble
the following:
项目设置的 **General(常规)** 选项应类似于以下内容:
{:width="100%"}
For a detailed overview of app signing, see
[Create, export, and delete signing certificates][appsigning].
有关应用程序签名的详细概述,请参阅 [创建、导出和删除签名证书][appsigning]。
[Supported deployment platforms]: /reference/supported-platforms
## Configuring the app's name, bundle identifier and copyright
## 配置应用名称、Bundle ID 和版权信息
The configuration for the product identifiers are centralized
in `macos/Runner/Configs/AppInfo.xcconfig`. For the app's name,
set `PRODUCT_NAME`, for the copyright set `PRODUCT_COPYRIGHT`,
and finally set `PRODUCT_BUNDLE_IDENTIFIER` for the app's
bundle identifier.
引用标识的配置集中在 `macos/Runner/Configs/AppInfo.xcconfig` 文件中。
想修改应用名称,设置 `PRODUCT_NAME`;想修改版权信息,设置 `PRODUCT_COPYRIGHT`;
想修改 Bundle ID,设置 `PRODUCT_BUNDLE_IDENTIFIER`。
## Updating the app's version number
## 更新应用程序的版本号
The default version number of the app is `1.0.0`.
To update it, navigate to the `pubspec.yaml` file
and update the following line:
应用程序的默认版本号为 `1.0.0`。
如需更新版本号,在 `pubspec.yaml` 文件中更新以下位置:
`version: 1.0.0+1`
The version number is three numbers separated by dots,
such as `1.0.0` in the example above, followed by an optional
build number such as `1` in the example above, separated by a `+`.
版本号是三个用点分隔的数字,如上面示例中的 `1.0.0`,
后面用 `+` 分隔的是可选的内部版本号,如上面示例中的 `1`。
Both the version and the build number can be overridden in Flutter's
build by specifying `--build-name` and `--build-number`,
respectively.
版本号和内部版本号都可以在 Flutter 构建时,
通过指定 `--build name` 和 `--build number` 进行覆盖。
In macOS, `build-name` uses `CFBundleShortVersionString`
while `build-number` uses `CFBundleVersion`.
Read more about iOS versioning at [Core Foundation Keys][]
on the Apple Developer's site.
在 macOS 中,`build-name` 使用 `CFBundleShortVersionString`,
而 `build-number` 使用 `CFBundleVersion`。
在苹果开发者的网站上,查看更多关于 iOS 版本的 [Core Foundation Keys][Core Foundation Keys] 。
## Add an app icon
## 添加应用程序图标
When a new Flutter app is created, a placeholder icon set is created.
This step covers replacing these placeholder icons with your
app's icons:
创建一个新的 Flutter 应用程序时,会创建一个占位图标集。
此步骤包含如何用应用程序的图标替换这些占位图标:
1. Review the [macOS App Icon][appicon] guidelines.
查看 [macOS 应用程序图标][appicon] 指南。
1. In the Xcode project navigator, select `Assets.xcassets` in the
`Runner` folder. Update the placeholder icons with your own app icons.
在 Xcode 项目导航栏的 `Runner` 文件夹中选择 `Assets.xcassets`。
用你自己的应用程序图标更新占位图标。
1. Verify the icon has been replaced by running your app using
`flutter run -d macos`.
使用 `flutter run -d macos` 运行应用程序,验证图标是否已被替换。
## Create a build archive with Xcode
## 创建构建存档
This step covers creating a build archive and uploading
your build to App Store Connect using Xcode.
此步骤包含创建构建存档并将其上传到 App Store Connect。
During development, you've been building, debugging, and testing
with _debug_ builds. When you're ready to ship your app to users
on the App Store or TestFlight, you need to prepare a _release_ build.
At this point, you might consider [obfuscating your Dart code][]
to make it more difficult to reverse engineer. Obfuscating
your code involves adding a couple flags to your build command.
在开发时,你已经完成了在 **debug** 模式下的应用构建、调试和测试。
当你准备好在 App Store 或 TestFlight 上向用户发布应用时,你需要准备一个 **release** 版产物。
此时,你可以考虑 [混淆你的 Dart 代码][obfuscating your Dart code] 让逆向工程变得更加困难。
混淆你的代码需要向构建命令添加两个标志。
In Xcode, configure the app version and build:
在 Xcode 中,配置应用程序版本和内部版本:
1. Open `Runner.xcworkspace` in your app's `macos` folder. To do this from
the command line, run the following command from the base directory of your
application project.
打开 `macos` 文件夹中的 `Runner.xcworkspace` 工程项目,若要在命令行中这样做
就切换到工程的文件夹下运行下面的命令:
```console
open macos/Runner.xcworkspace
```
1. Select **Runner** in the Xcode project navigator, then select the
**Runner** target in the settings view sidebar.
在 Xcode 项目导航栏中选择 **Runner**,然后在设置侧栏中选择 **Runner** 目标。
1. In the Identity section, update the **Version** to the user-facing
version number you wish to publish.
在标识部分,将 **Version(版本)** 更新为要发布的版本号。
1. In the Identity section, update the **Build** identifier to a unique
build number used to track this build on App Store Connect.
Each upload requires a unique build number.
在标识部分,将 **Build identifier(构建标识)**
更新为在 App Store Connect 上可以跟踪此生成的唯一生成串。
每次上传都需要一个唯一的构建标识。
Finally, create a build archive and upload it to App Store Connect:
最后,创建一个构建归档并将其上传到 App Store Connect:
1. Create a release Archive of your application. From the base directory of
your application project, run the following.
为你的应用创建一个发布归档,命令行切换到你的工程目录,
运行下面的命令:
```console
flutter build macos
```
1. Open Xcode and select **Product > Archive** to open the archive created
in the previous step.
打开 Xcode 并选择 **Product > Archive**,打开上个步骤生成的归档文件;
1. Click the **Validate App** button. If any issues are reported,
address them and produce another build. You can reuse the same
build ID until you upload an archive.
点击 **Validate App** 按钮。如果报告了任何问题,请尝试解决并再次构建。
在上传归档之前,可以重用相同的构建 ID。
1. After the archive has been successfully validated, click
**Distribute App**. You can follow the status of your build in the
Activities tab of your app's details page on
[App Store Connect][appstoreconnect_login].
成功验证归档后,点击 **Distribute App**。
你可以在 [App Store Connect][appstoreconnect_login]
上的应用程序详细信息页的活动标签下查看构建状态。
You should receive an email within 30 minutes notifying you that
your build has been validated and is available to release to testers
on TestFlight. At this point you can choose whether to release
on TestFlight, or go ahead and release your app to the App Store.
你应该会在 30 分钟内收到一封邮件。告知你的构建已经过验证,
可以在 TestFlight 上发布给测试人员。
此时,你可以选择在 TestFlight 上发布,或者继续将应用程序发布到应用程序商店。
For more details, see
[Upload an app to App Store Connect][distributionguide_upload].
更多详细信息,请参阅
[将应用程序上传到 App Store Connect][distributionguide_upload]。
## Create a build archive with Codemagic CLI tools
## 使用 Codemagic 命令行工具创建一个构建归档
This step covers creating a build archive and uploading
your build to App Store Connect using Flutter build commands
and [Codemagic CLI Tools][codemagic_cli_tools] executed in a terminal
in the Flutter project directory.
下面的步骤,我们会介绍在 Flutter 应用的工程目录下执行
Flutter 构建命令和 [Codemagic 命令行工具][codemagic_cli_tools],
创建一个构建归档并将其上传至 App Store Connect。
-
Install the Codemagic CLI tools:
安装 Codemagic 命令行工具:
```bash
pip3 install codemagic-cli-tools
```
-
You'll need to generate an [App Store Connect API Key][appstoreconnect_api_key]
with App Manager access to automate operations with App Store Connect. To make
subsequent commands more concise, set the following environment variables from
the new key: issuer id, key id, and API key file.
你需要生成一个具有 App Manager 访问权限的 App Store Connect API 密钥,
以方便对 App Store Connect 进行自动化操作。为了使后续的命令更简洁,
请设置下面的环境变量:发行者 ID、密钥 ID、API 密钥文件:
```bash
export APP_STORE_CONNECT_ISSUER_ID=aaaaaaaa-bbbb-cccc-dddd-eeeeeeeeeeee
export APP_STORE_CONNECT_KEY_IDENTIFIER=ABC1234567
export APP_STORE_CONNECT_PRIVATE_KEY=`cat /path/to/api/key/AuthKey_XXXYYYZZZ.p8`
```
-
You need to export or create a Mac App Distribution and a Mac Installer
Distribution certificate to perform code signing and package a build archive.
你需要导出或者创建 Mac App Distribution 和 Mac Installer Distribution 证书,
以便与执行代码签名以及打包构建归档。
If you have existing [certificates][devportal_certificates], you can export the
private keys by executing the following command for each certificate:
对于已有的 [证书][devportal_certificates],你可以选择通过下吗的命令
来导出私钥:
```bash
openssl pkcs12 -in .p12 -nodes -nocerts | openssl rsa -out cert_key
```
Or you can create a new private key by executing the following command:
或者通过以下命令创建一个新的私钥:
```bash
ssh-keygen -t rsa -b 2048 -m PEM -f cert_key -q -N ""
```
Later, you can have CLI tools automatically create a new Mac App Distribution and
Mac Installer Distribution certificate. You can use the same private key for
each new certificate.
之后,你可以让命令行工具自动创建新的
Mac App Distribution 和 Mac Installer Distribution 证书,
每个新的证书都可以使用相同的私钥。
-
Fetch the code signing files from App Store Connect:
从 App Store Connect 获取需要代码签名的文件:
```bash
app-store-connect fetch-signing-files YOUR.APP.BUNDLE_ID \
--platform MAC_OS \
--type MAC_APP_STORE \
--certificate-key=@file:/path/to/cert_key \
--create
```
Where `cert_key` is either your exported Mac App Distribution certificate private key
or a new private key which automatically generates a new certificate.
上面代码里的 `cert_key` 是你已导出的或者新生成的
Mac App Distribution 证书私钥。
-
If you do not have a Mac Installer Distribution certificate,
you can create a new certificate by executing the following:
如果你还没有 Mac Installer Distribution 证书,
通过执行下面的命令行可以生成一个:
```bash
app-store-connect certificates create \
--type MAC_INSTALLER_DISTRIBUTION \
--certificate-key=@file:/path/to/cert_key \
--save
```
Use `cert_key` of the private key you created earlier.
使用你之前创建的私钥的 `cert_key`。
-
Fetch the Mac Installer Distribution certificates:
获取 Mac 安装程序分发证书:
```bash
app-store-connect certificates list \
--type MAC_INSTALLER_DISTRIBUTION \
--certificate-key=@file:/path/to/cert_key \
--save
```
-
Set up a new temporary keychain to be used for code signing:
设置用于代码签名的新临时钥匙串:
```bash
keychain initialize
```
:::note 重置登录钥匙串!
After running `keychain initialize` you **must** run the following:
运行 `keychain initialize` 后,你 **必须** 运行以下命令:
`keychain use-login`
This sets your login keychain as the default to avoid potential
authentication issues with apps on your machine.
这会将你的登录钥匙串设置为默认值,
以避免你机器上的应用程序出现潜在的身份验证问题。
:::
-
Now add the fetched certificates to your keychain:
现在将获取的证书添加到你的钥匙串中:
```bash
keychain add-certificates
```
-
Update the Xcode project settings to use fetched code signing profiles:
更新 Xcode 项目设置以使用获取的代码签名配置文件:
```bash
xcode-project use-profiles
```
-
Install Flutter dependencies:
安装 Flutter 依赖项:
```bash
flutter packages pub get
```
-
Install CocoaPods dependencies:
安装 CocoaPods 依赖项:
```bash
find . -name "Podfile" -execdir pod install \;
```
-
Build the Flutter macOS project:
构建 Flutter macOS 项目:
```bash
flutter build macos --release
```
-
Package the app:
打包应用程序:
```bash
APP_NAME=$(find $(pwd) -name "*.app")
PACKAGE_NAME=$(basename "$APP_NAME" .app).pkg
xcrun productbuild --component "$APP_NAME" /Applications/ unsigned.pkg
INSTALLER_CERT_NAME=$(keychain list-certificates \
| jq '[.[]
| select(.common_name
| contains("Mac Developer Installer"))
| .common_name][0]' \
| xargs)
xcrun productsign --sign "$INSTALLER_CERT_NAME" unsigned.pkg "$PACKAGE_NAME"
rm -f unsigned.pkg
```
-
Publish the packaged app to App Store Connect:
将打包的应用发布到 App Store Connect:
```bash
app-store-connect publish \
--path "$PACKAGE_NAME"
```
-
As mentioned earlier, don't forget to set your login keychain
as the default to avoid authentication issues
with apps on your machine:
如前所述,不要忘记将你的登录钥匙串设置为默认设置,
以避免你机器上的应用程序出现身份验证问题:
```bash
keychain use-login
```
## Release your app on TestFlight
## 将你的应用发布到 TestFlight
[TestFlight][] allows developers to push their apps
to internal and external testers. This optional step
covers releasing your build on TestFlight.
[TestFlight][] 允许开发者将其应用推送给内部和外部的测试人员。
以下步骤将指导你如何将你的应用在 TestFlight 分发给测试人员。
1. Navigate to the TestFlight tab of your app's application
details page on [App Store Connect][appstoreconnect_login].
在 [App Store Connect][appstoreconnect_login] 中,
前往你的应用详情的 TestFlight 标签。
1. Select **Internal Testing** in the sidebar.
在侧边栏中选择 **Internal Testing**。
1. Select the build to publish to testers, then click **Save**.
选择需要发布给测试人员的构建版本,点击 **保存**。
1. Add the email addresses of any internal testers.
You can add additional internal users in the **Users and Roles**
page of App Store Connect,
available from the dropdown menu at the top of the page.
添加测试人员的电子邮件。
你可以在 **Users and Roles** 配置测试人员,该选项在页面顶部的下拉菜单中。
## Distribute to registered devices
## 分发到已注册的设备
See [distribution guide][distributionguide_macos]
to prepare an archive for distribution to designated Mac computers.
请参阅 [分发指南][distributionguide_macos],
准备一个归档文件,以便分发到指定的 Mac 设备。
## Release your app to the App Store
## 将应用程序发布到应用程序商店
When you're ready to release your app to the world,
follow these steps to submit your app for review and
release to the App Store:
当你准备向全世界发布应用程序时,
请按照以下步骤提交应用程序以供审阅并发布到应用程序商店:
1. Select **Pricing and Availability** from the sidebar of your app's
application details page on
[App Store Connect][appstoreconnect_login] and complete the
required information.
在 [App Store Connect][appstoreconnect_login]
应用程序详情页的侧栏中选择 **定价和可用性**,并完善相关信息。
1. Select the status from the sidebar. If this is the first
release of this app, its status is
**1.0 Prepare for Submission**. Complete all required fields.
从侧边栏中选择状态。
如果这是应用程序的第一个版本,
则其状态为 **1.0 准备提交**。填写所有必填字段。
1. Click **Submit for Review**.
点击 **提交审核**。
Apple notifies you when their app review process is complete.
Your app is released according to the instructions you
specified in the **Version Release** section.
苹果会在你的应用程序审核完成后通知你。
应用程序是按照你在 **版本发布** 说明中发布的。
For more details, see
[Distribute an app through the App Store][distributionguide_submit].
更多详细信息,请参阅 [通过应用程序商店分发应用程序][distributionguide_submit].
## Troubleshooting
## 故障排除
The [Distribute your app][distributionguide] guide provides a
detailed overview of the process of releasing an app to the App Store.
[分发你的应用程序][distributionguide] 指南详细概述了将应用程序发布到应用商店的过程。
## Additional resources
## 其他资源
To learn how to package and distribute your Flutter desktop app
for macOS the open source way, without using a paid Apple developer
account, check out the step-by-step
[macOS packaging guide][macos_packaging_guide].
请查看按步骤实施的 [macOS 打包指南][macos_packaging_guide]
来了解如何在不使用 Apple 付费开发者账户的情况下,
以开源的方式打包和发布适用于 macOS 的 Flutter 桌面应用。
[appicon]: https://developer.apple.com/design/human-interface-guidelines/macos/icons-and-images/app-icon/
[appreview]: https://developer.apple.com/app-store/review/
[appsigning]: https://help.apple.com/xcode/mac/current/#/dev154b28f09
[appstore]: https://developer.apple.com/app-store/submissions/
[appstoreconnect]: https://developer.apple.com/support/app-store-connect/
[appstoreconnect_api_key]: https://appstoreconnect.apple.com/access/api
[appstoreconnect_guide]: https://developer.apple.com/support/app-store-connect/
[appstoreconnect_guide_register]: https://help.apple.com/app-store-connect/#/dev2cd126805
[appstoreconnect_login]: https://appstoreconnect.apple.com/
[codemagic_cli_tools]: https://github.com/codemagic-ci-cd/cli-tools
[codesigning_guide]: https://developer.apple.com/library/content/documentation/Security/Conceptual/CodeSigningGuide/Introduction/Introduction.html
[Core Foundation Keys]: https://developer.apple.com/library/archive/documentation/General/Reference/InfoPlistKeyReference/Articles/CoreFoundationKeys.html
[devportal_appids]: https://developer.apple.com/account/resources/identifiers/list
[devportal_certificates]: https://developer.apple.com/account/resources/certificates/list
[devprogram]: https://developer.apple.com/programs/
[devprogram_membership]: https://developer.apple.com/support/compare-memberships/
[distributionguide]: https://help.apple.com/xcode/mac/current/#/dev8b4250b57
[distributionguide_config]: https://help.apple.com/xcode/mac/current/#/dev91fe7130a
[distributionguide_macos]: https://help.apple.com/xcode/mac/current/#/dev295cc0fae
[distributionguide_submit]: https://help.apple.com/xcode/mac/current/#/dev067853c94
[distributionguide_upload]: https://help.apple.com/xcode/mac/current/#/dev442d7f2ca
[obfuscating your Dart code]: /deployment/obfuscate
[TestFlight]: https://developer.apple.com/testflight/
[macos_packaging_guide]: https://medium.com/@fluttergems/packaging-and-distributing-flutter-desktop-apps-the-missing-guide-part-1-macos-b36438269285