# 高级 UI 特性
> 高级 UI 特性的温和入门: 自适应布局、sliver、滚动、导航。
Preview the Rolodex app you'll build and set up a Cupertino-based project with data models.
预览你将构建的 Rolodex 应用,并搭建基于 Cupertino 的项目与数据模型。
title: 你将完成的内容
items:
- title: 预览你将构建的 Rolodex 应用
icon: preview
- title: 使用 Cupertino widget 搭建项目
icon: phone_iphone
- title: 为联系人和分组创建数据模型
icon: data_object
---
### 简介
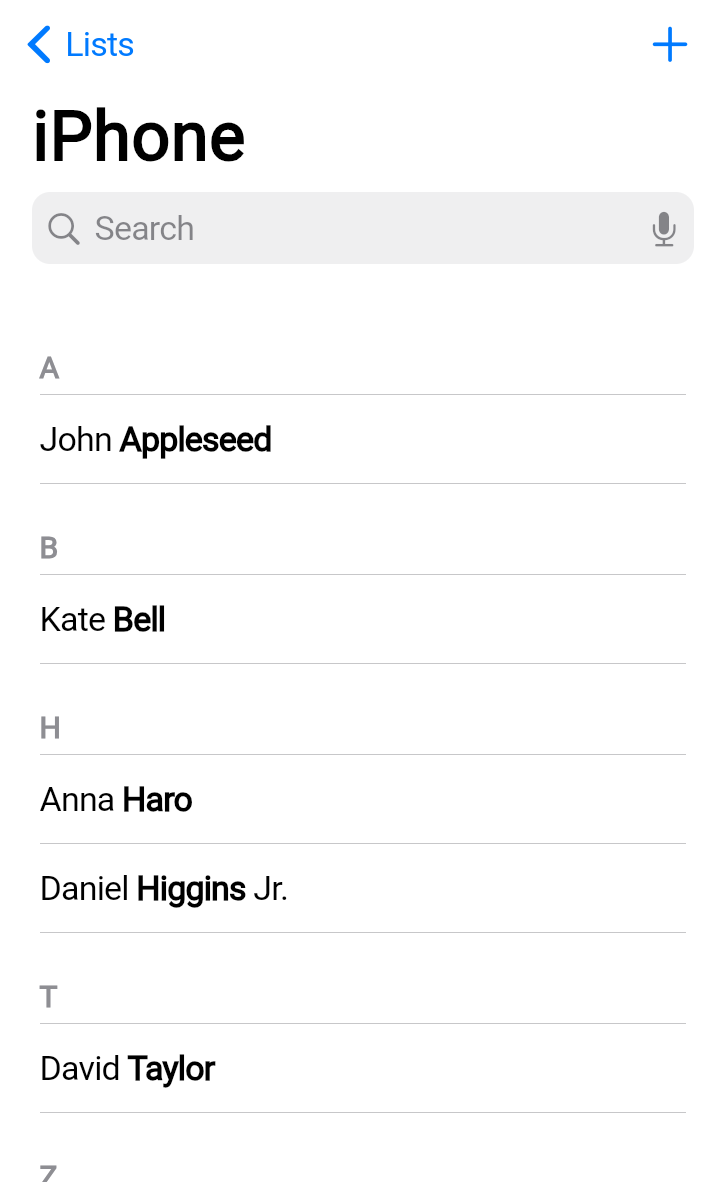
In this third installment of the Flutter tutorial series,
you'll use Flutter's Cupertino library to build a
partial clone of the iOS Contacts app.
在 Flutter 教程系列的第三部中,
你将使用 Flutter 的 Cupertino 库构建
iOS 通讯录应用的部分克隆版。
 By the end of this tutorial, you'll have learned how to create
adaptive layouts, implement comprehensive theming, build navigation
patterns, and use advanced scrolling techniques.
学完本教程后,你将学会如何创建
自适应布局、实现全面的主题、构建导航
模式,以及使用高级滚动技术。
#### 你将学习的内容
This tutorial explores the following topics:
本教程探讨以下主题:
* Building responsive layouts with `LayoutBuilder`.
使用 `LayoutBuilder` 构建响应式布局。
* Using advanced scrolling with slivers and search.
使用 sliver 和搜索实现高级滚动。
* Implementing stack-based navigation patterns.
实现基于堆栈的导航模式。
* Creating comprehensive themes with `CupertinoThemeData`.
使用 `CupertinoThemeData` 创建全面的主题。
* Supporting both light and dark themes.
支持浅色和深色主题。
* Creating an iOS-style UI using Cupertino widgets.
使用 Cupertino widget 创建 iOS 风格 UI。
This tutorial assumes that you've completed the previous Flutter tutorials
and are comfortable with basic widget composition, state management,
and the Flutter project structure.
本教程假定你已完成之前的 Flutter 教程,
并熟悉基本的 widget 组合、状态管理
以及 Flutter 项目结构。
### 创建新的 Flutter 项目
To build a Flutter app, you first need a Flutter project.
You can create a new app with the [Flutter CLI tool][],
which is installed as part of the Flutter SDK.
要构建 Flutter 应用,你首先需要一个 Flutter 项目。
你可以使用随 Flutter SDK 一起安装的 [Flutter CLI 工具][Flutter CLI tool]
创建新应用。
Open your preferred terminal and run
the following command to create a new Flutter project:
打开你偏好的终端并运行
以下命令以创建新的 Flutter 项目:
```console
$ flutter create rolodex --empty
$ cd rolodex
```
This command creates a new Flutter project that
uses the minimal "empty" template.
此命令会创建一个使用精简「empty」模板的
新 Flutter 项目。
[Flutter CLI tool]: /reference/flutter-cli
### 添加 Cupertino Icons 依赖
This project uses the [`cupertino_icons` package][],
an official Flutter package.
Add it as a dependency by running the following command:
此项目使用 [`cupertino_icons` package][],
这是一个官方 Flutter package。
通过运行以下命令将其添加为依赖:
```console
$ flutter pub add cupertino_icons
```
### 搭建项目结构
First, create the basic directory structure for your app.
In your project's `lib` directory, create the following folders:
首先,为应用创建基本目录结构。
在项目的 `lib` 目录中,创建以下文件夹:
```console
$ mkdir lib/data lib/screens lib/theme
```
This command creates folders to organize your code into logical sections:
data models, screen widgets, and theme configuration.
此命令会创建文件夹,将代码组织为逻辑分区:
数据模型、屏幕 widget 和主题配置。
### 替换入门代码
In your IDE, open the `lib/main.dart` file, and replace its entire
contents with the following starter code:
在 IDE 中打开 `lib/main.dart` 文件,并将其全部
内容替换为以下入门代码:
```dart
import 'package:flutter/cupertino.dart';
void main() {
runApp(const RolodexApp());
}
class RolodexApp extends StatelessWidget {
const RolodexApp({super.key});
@override
Widget build(BuildContext context) {
return const CupertinoApp(
title: 'Rolodex',
theme: CupertinoThemeData(
barBackgroundColor: CupertinoDynamicColor.withBrightness(
color: Color(0xFFF9F9F9),
darkColor: Color(0xFF1D1D1D),
),
),
home: CupertinoPageScaffold(child: Center(child: Text('Hello Rolodex!'))),
);
}
}
```
Unlike the previous two tutorials,
this app uses `CupertinoApp` instead of `MaterialApp`.
The Cupertino design system provides iOS-style widgets and styling,
which is perfect for building apps that feel native on Apple devices.
与之前两个教程不同,
此应用使用 `CupertinoApp` 而非 `MaterialApp`。
Cupertino 设计系统提供 iOS 风格的 widget 和样式,
非常适合构建在 Apple 设备上具有原生体验的应用。
### 运行应用
In your terminal at the root of your Flutter app, run the following command:
在 Flutter 应用根目录的终端中,运行以下命令:
```console
$ flutter run -d chrome
```
The app builds and launches in a new instance of Chrome.
It displays "Hello Rolodex!" in the center of the screen.
应用会在新的 Chrome 实例中构建并启动。
它会在屏幕中央显示「Hello Rolodex!」。
### 创建数据模型
Before building the UI,
create the data structures and sample data that the app will use.
This section is lightly explained because it's not the focus of this tutorial.
在构建 UI 之前,
创建应用将使用的数据结构和示例数据。
本节仅作简要说明,因为不是本教程的重点。
#### 联系人数据
Create a new file, `lib/data/contact.dart`, and add the basic `Contact` class:
创建新文件 `lib/data/contact.dart`,并添加基本的 `Contact` 类:
```dart foldable
class Contact {
Contact({
required this.id,
required this.firstName,
this.middleName,
required this.lastName,
this.suffix,
});
final int id;
final String firstName;
final String lastName;
final String? middleName;
final String? suffix;
}
[* -
final johnAppleseed = Contact(id: 0, firstName: 'John', lastName: 'Appleseed');
final kateBell = Contact(id: 1, firstName: 'Kate', lastName: 'Bell');
final annaHaro = Contact(id: 2, firstName: 'Anna', lastName: 'Haro');
final danielHiggins = Contact(
id: 3,
firstName: 'Daniel',
lastName: 'Higgins',
suffix: 'Jr.',
);
final davidTaylor = Contact(id: 4, firstName: 'David', lastName: 'Taylor');
final hankZakroff = Contact(
id: 5,
firstName: 'Hank',
middleName: 'M.',
lastName: 'Zakroff',
);
final alexAnderson = Contact(id: 6, firstName: 'Alex', lastName: 'Anderson');
final benBrown = Contact(id: 7, firstName: 'Ben', lastName: 'Brown');
final carolCarter = Contact(id: 8, firstName: 'Carol', lastName: 'Carter');
final dianaDevito = Contact(id: 9, firstName: 'Diana', lastName: 'Devito');
final emilyEvans = Contact(id: 10, firstName: 'Emily', lastName: 'Evans');
final frankFisher = Contact(id: 11, firstName: 'Frank', lastName: 'Fisher');
final graceGreen = Contact(id: 12, firstName: 'Grace', lastName: 'Green');
final henryHall = Contact(id: 13, firstName: 'Henry', lastName: 'Hall');
final isaacIngram = Contact(id: 14, firstName: 'Isaac', lastName: 'Ingram');
final juliaJackson = Contact(id: 15, firstName: 'Julia', lastName: 'Jackson');
final kevinKelly = Contact(id: 16, firstName: 'Kevin', lastName: 'Kelly');
final lindaLewis = Contact(id: 17, firstName: 'Linda', lastName: 'Lewis');
final michaelMiller = Contact(id: 18, firstName: 'Michael', lastName: 'Miller');
final nancyNewman = Contact(id: 19, firstName: 'Nancy', lastName: 'Newman');
final oliverOwens = Contact(id: 20, firstName: 'Oliver', lastName: 'Owens');
final penelopeParker = Contact(
id: 21,
firstName: 'Penelope',
lastName: 'Parker',
);
final quentinQuinn = Contact(id: 22, firstName: 'Quentin', lastName: 'Quinn');
final rachelReed = Contact(id: 23, firstName: 'Rachel', lastName: 'Reed');
final samuelSmith = Contact(id: 24, firstName: 'Samuel', lastName: 'Smith');
final tessaTurner = Contact(id: 25, firstName: 'Tessa', lastName: 'Turner');
final umbertoUpton = Contact(id: 26, firstName: 'Umberto', lastName: 'Upton');
final victoriaVance = Contact(id: 27, firstName: 'Victoria', lastName: 'Vance');
final williamWilson = Contact(id: 28, firstName: 'William', lastName: 'Wilson');
final xavierXu = Contact(id: 29, firstName: 'Xavier', lastName: 'Xu');
final yasmineYoung = Contact(id: 30, firstName: 'Yasmine', lastName: 'Young');
final zacharyZimmerman = Contact(
id: 31,
firstName: 'Zachary',
lastName: 'Zimmerman',
);
final elizabethMJohnson = Contact(
id: 32,
firstName: 'Elizabeth',
middleName: 'M.',
lastName: 'Johnson',
);
final robertLWilliamsSr = Contact(
id: 33,
firstName: 'Robert',
middleName: 'L.',
lastName: 'Williams',
suffix: 'Sr.',
);
final margaretAnneDavis = Contact(
id: 34,
firstName: 'Margaret',
middleName: 'Anne',
lastName: 'Davis',
);
final williamJamesBrownIII = Contact(
id: 35,
firstName: 'William',
middleName: 'James',
lastName: 'Brown',
suffix: 'III',
);
final maryElizabethClark = Contact(
id: 36,
firstName: 'Mary',
middleName: 'Elizabeth',
lastName: 'Clark',
);
final drSarahWatson = Contact(
id: 37,
firstName: 'Dr. Sarah',
lastName: 'Watson',
);
final jamesRSmithEsq = Contact(
id: 38,
firstName: 'James',
middleName: 'R.',
lastName: 'Smith',
suffix: 'Esq.',
);
final mariaCruz = Contact(id: 39, firstName: 'Maria', lastName: 'Cruz');
final pierreMartin = Contact(id: 40, firstName: 'Pierre', lastName: 'Martin');
final yukiTanaka = Contact(id: 41, firstName: 'Yuki', lastName: 'Tanaka');
final hansSchmidt = Contact(id: 42, firstName: 'Hans', lastName: 'Schmidt');
final priyaPatel = Contact(id: 43, firstName: 'Priya', lastName: 'Patel');
final carlosGarcia = Contact(id: 44, firstName: 'Carlos', lastName: 'Garcia');
final ninaVolkova = Contact(id: 45, firstName: 'Nina', lastName: 'Volkova');
final jenniferAdams = Contact(id: 46, firstName: 'Jennifer', lastName: 'Adams');
final michaelBaker = Contact(id: 47, firstName: 'Michael', lastName: 'Baker');
final sarahCooper = Contact(id: 48, firstName: 'Sarah', lastName: 'Cooper');
final christopherDaniel = Contact(
id: 49,
firstName: 'Christopher',
lastName: 'Daniel',
);
final jessicaEdwards = Contact(
id: 50,
firstName: 'Jessica',
lastName: 'Edwards',
);
*]
[* -
final Set allContacts = {
johnAppleseed,
kateBell,
annaHaro,
danielHiggins,
davidTaylor,
hankZakroff,
alexAnderson,
benBrown,
carolCarter,
dianaDevito,
emilyEvans,
frankFisher,
graceGreen,
henryHall,
isaacIngram,
juliaJackson,
kevinKelly,
lindaLewis,
michaelMiller,
nancyNewman,
oliverOwens,
penelopeParker,
quentinQuinn,
rachelReed,
samuelSmith,
tessaTurner,
umbertoUpton,
victoriaVance,
williamWilson,
xavierXu,
yasmineYoung,
zacharyZimmerman,
elizabethMJohnson,
robertLWilliamsSr,
margaretAnneDavis,
williamJamesBrownIII,
maryElizabethClark,
drSarahWatson,
jamesRSmithEsq,
mariaCruz,
pierreMartin,
yukiTanaka,
hansSchmidt,
priyaPatel,
carlosGarcia,
ninaVolkova,
jenniferAdams,
michaelBaker,
sarahCooper,
christopherDaniel,
jessicaEdwards,
};
*]
```
This sample data includes contacts with and without middle names and suffixes.
This gives you a variety of data to work with as you build the UI.
此示例数据包含带和不带中间名、后缀的联系人。
这为你构建 UI 时提供了多种数据可供使用。
#### ContactGroup 数据
Now, create the contact groups that organize your contacts into lists.
Create a new `lib/data/contact_group.dart` file and
add the `ContactGroup` class:
现在,创建将联系人组织成列表的分组。
创建新的 `lib/data/contact_group.dart` 文件并
添加 `ContactGroup` 类:
```dart
import 'dart:collection';
import 'package:flutter/cupertino.dart';
import 'contact.dart';
class ContactGroup {
factory ContactGroup({
required int id,
required String label,
bool permanent = false,
String? title,
List? contacts,
}) {
final contactsCopy = contacts ?? [];
_sortContacts(contactsCopy);
return ContactGroup._internal(
id: id,
label: label,
permanent: permanent,
title: title,
contacts: contactsCopy,
);
}
ContactGroup._internal({
required this.id,
required this.label,
this.permanent = false,
String? title,
List? contacts,
}) : title = title ?? label,
_contacts = contacts ?? const [];
final int id;
final bool permanent;
final String label;
final String title;
final List _contacts;
List get contacts => _contacts;
AlphabetizedContactMap get alphabetizedContacts {
final contactsMap = AlphabetizedContactMap();
for (final contact in _contacts) {
final lastInitial = contact.lastName[0].toUpperCase();
if (contactsMap.containsKey(lastInitial)) {
contactsMap[lastInitial]!.add(contact);
} else {
contactsMap[lastInitial] = [contact];
}
}
return contactsMap;
}
}
```
A `ContactGroup` represents a collection of contacts,
such as "All Contacts" or "Favorites".
`ContactGroup` 表示一组联系人,
例如「All Contacts」或「Favorites」。
Add the following helper code and sample data to `lib/data/contact_group.dart`:
将以下辅助代码和示例数据添加到 `lib/data/contact_group.dart`:
```dart
typedef AlphabetizedContactMap = SplayTreeMap>;
/// Sorts a list of [contacts] alphabetically by
/// last name, then first name, then middle name.
/// If names are identical, sorts by contact ID to ensure consistent ordering.
void _sortContacts(List contacts) {
contacts.sort((a, b) {
final checkLastName = a.lastName.compareTo(b.lastName);
if (checkLastName != 0) {
return checkLastName;
}
final checkFirstName = a.firstName.compareTo(b.firstName);
if (checkFirstName != 0) {
return checkFirstName;
}
if (a.middleName != null && b.middleName != null) {
final checkMiddleName = a.middleName!.compareTo(b.middleName!);
if (checkMiddleName != 0) {
return checkMiddleName;
}
} else if (a.middleName != null || b.middleName != null) {
return a.middleName != null ? 1 : -1;
}
// If both contacts have the exact same name, order by first created.
return a.id.compareTo(b.id);
});
}
final allPhone = ContactGroup(
id: 0,
permanent: true,
label: 'All iPhone',
title: 'iPhone',
contacts: allContacts.toList(),
);
final friends = ContactGroup(
id: 1,
label: 'Friends',
contacts: [allContacts.elementAt(3)],
);
final work = ContactGroup(id: 2, label: 'Work');
List generateSeedData() {
return [allPhone, friends, work];
}
```
This code creates three sample groups and a function to
generate the initial data for the app.
此代码创建三个示例分组和一个函数,用于
生成应用的初始数据。
Finally, add a class that manages state changes to `lib/data/contact_group.dart`:
最后,在 `lib/data/contact_group.dart` 中添加管理状态变化的类:
```dart
class ContactGroupsModel {
ContactGroupsModel() : _listsNotifier = ValueNotifier(generateSeedData());
final ValueNotifier> _listsNotifier;
ValueNotifier> get listsNotifier => _listsNotifier;
List get lists => _listsNotifier.value;
ContactGroup findContactList(int id) {
return lists[id];
}
void dispose() {
_listsNotifier.dispose();
}
}
```
If you aren't familiar with `ValueNotifier`,
you should complete the [previous tutorial covering state][] before continuing,
which covers state management.
如果你不熟悉 `ValueNotifier`,
应先完成 [涵盖状态的上一篇教程][previous tutorial covering state] 再继续,
该教程涵盖状态管理。
[previous tutorial covering state]: /learn/pathway/tutorial/set-up-state-project
### 将数据连接到应用
Update your `main.dart` to include the global state and
import the new data file:
更新 `main.dart` 以包含全局状态并
导入新的数据文件:
```dart
import 'package:flutter/cupertino.dart';
import 'data/contact_group.dart';
final contactGroupsModel = ContactGroupsModel();
void main() {
runApp(const RolodexApp());
}
class RolodexApp extends StatelessWidget {
const RolodexApp({super.key});
@override
Widget build(BuildContext context) {
return const CupertinoApp(
title: 'Rolodex',
theme: CupertinoThemeData(
barBackgroundColor: CupertinoDynamicColor.withBrightness(
color: Color(0xFFF9F9F9),
darkColor: Color(0xFF1D1D1D),
),
),
home: CupertinoPageScaffold(child: Center(child: Text('Hello Rolodex!'))),
);
}
}
```
With all the extraneous code out of the way, in the next lesson,
you'll start building the app in earnest.
清理完所有多余代码后,在下一课中,
你将正式开始构建应用。
[`cupertino_icons` package]: https://pub-web.flutter-io.cn/packages/cupertino_icons
### 回顾
title: 你完成的内容
subtitle: 以下是你本课构建与学习内容的摘要。
completed: true
items:
- title: 预览了 Rolodex 应用
icon: preview
details: >-
你正在开始一个专注于高级 UI 特性的新教程章节。
为了让应用在任何设备上都感觉精致且原生,
你将学习自适应布局、sliver、导航和主题。
- title: 使用 Cupertino widget 搭建了项目
icon: phone_iphone
details: >-
与之前的课程不同,
此应用使用 `CupertinoApp` 而非 `MaterialApp`。
Cupertino 设计系统提供在 Apple 设备上
具有原生体验的 iOS 风格 widget。
- title: 为联系人和分组创建了数据模型
icon: data_object
details: >-
你创建了带示例数据的 `Contact` 和 `ContactGroup` 类,
以及用于状态管理的 `ContactGroupsModel`。
这一基础将支持你在后续课程中构建的 UI。
### 自测
- question: CupertinoApp 与 MaterialApp 的主要区别是什么?
options:
- text: CupertinoApp 只能在 iOS 设备上运行。
correct: false
explanation: CupertinoApp 可在任何平台上运行;它只是提供 iOS 风格的 widget。
- text: CupertinoApp 提供 iOS 风格的 widget 和样式,而 MaterialApp 提供 Material Design widget。
correct: true
explanation: CupertinoApp 使用与 iOS 外观和体验相匹配的 Cupertino 设计系统 widget。
- text: CupertinoApp 更轻量且性能更好。
correct: false
explanation: 两者性能相近;区别在于视觉风格,而非速度。
- text: MaterialApp 需要更多配置才能搭建。
correct: false
explanation: 两者搭建要求相近;只是使用不同的设计系统。
- question: ValueNotifier 在状态管理中的作用是什么?
options:
- text: 验证用户输入值。
correct: false
explanation: ValueNotifier 持有值并在值变化时通知,而非用于验证。
- text: 持有一个值,并在该值变化时通知监听者。
correct: true
explanation: ValueNotifier 是一个简单的 ChangeNotifier,它包装单个值并在变化时通知监听者。
- text: 在不同数据类型之间转换值。
correct: false
explanation: 类型转换不是 ValueNotifier 的用途。
- text: 将值永久存储在本地存储中。
correct: false
explanation: ValueNotifier 在内存中持有值;持久化需要单独实现。
By the end of this tutorial, you'll have learned how to create
adaptive layouts, implement comprehensive theming, build navigation
patterns, and use advanced scrolling techniques.
学完本教程后,你将学会如何创建
自适应布局、实现全面的主题、构建导航
模式,以及使用高级滚动技术。
#### 你将学习的内容
This tutorial explores the following topics:
本教程探讨以下主题:
* Building responsive layouts with `LayoutBuilder`.
使用 `LayoutBuilder` 构建响应式布局。
* Using advanced scrolling with slivers and search.
使用 sliver 和搜索实现高级滚动。
* Implementing stack-based navigation patterns.
实现基于堆栈的导航模式。
* Creating comprehensive themes with `CupertinoThemeData`.
使用 `CupertinoThemeData` 创建全面的主题。
* Supporting both light and dark themes.
支持浅色和深色主题。
* Creating an iOS-style UI using Cupertino widgets.
使用 Cupertino widget 创建 iOS 风格 UI。
This tutorial assumes that you've completed the previous Flutter tutorials
and are comfortable with basic widget composition, state management,
and the Flutter project structure.
本教程假定你已完成之前的 Flutter 教程,
并熟悉基本的 widget 组合、状态管理
以及 Flutter 项目结构。
### 创建新的 Flutter 项目
To build a Flutter app, you first need a Flutter project.
You can create a new app with the [Flutter CLI tool][],
which is installed as part of the Flutter SDK.
要构建 Flutter 应用,你首先需要一个 Flutter 项目。
你可以使用随 Flutter SDK 一起安装的 [Flutter CLI 工具][Flutter CLI tool]
创建新应用。
Open your preferred terminal and run
the following command to create a new Flutter project:
打开你偏好的终端并运行
以下命令以创建新的 Flutter 项目:
```console
$ flutter create rolodex --empty
$ cd rolodex
```
This command creates a new Flutter project that
uses the minimal "empty" template.
此命令会创建一个使用精简「empty」模板的
新 Flutter 项目。
[Flutter CLI tool]: /reference/flutter-cli
### 添加 Cupertino Icons 依赖
This project uses the [`cupertino_icons` package][],
an official Flutter package.
Add it as a dependency by running the following command:
此项目使用 [`cupertino_icons` package][],
这是一个官方 Flutter package。
通过运行以下命令将其添加为依赖:
```console
$ flutter pub add cupertino_icons
```
### 搭建项目结构
First, create the basic directory structure for your app.
In your project's `lib` directory, create the following folders:
首先,为应用创建基本目录结构。
在项目的 `lib` 目录中,创建以下文件夹:
```console
$ mkdir lib/data lib/screens lib/theme
```
This command creates folders to organize your code into logical sections:
data models, screen widgets, and theme configuration.
此命令会创建文件夹,将代码组织为逻辑分区:
数据模型、屏幕 widget 和主题配置。
### 替换入门代码
In your IDE, open the `lib/main.dart` file, and replace its entire
contents with the following starter code:
在 IDE 中打开 `lib/main.dart` 文件,并将其全部
内容替换为以下入门代码:
```dart
import 'package:flutter/cupertino.dart';
void main() {
runApp(const RolodexApp());
}
class RolodexApp extends StatelessWidget {
const RolodexApp({super.key});
@override
Widget build(BuildContext context) {
return const CupertinoApp(
title: 'Rolodex',
theme: CupertinoThemeData(
barBackgroundColor: CupertinoDynamicColor.withBrightness(
color: Color(0xFFF9F9F9),
darkColor: Color(0xFF1D1D1D),
),
),
home: CupertinoPageScaffold(child: Center(child: Text('Hello Rolodex!'))),
);
}
}
```
Unlike the previous two tutorials,
this app uses `CupertinoApp` instead of `MaterialApp`.
The Cupertino design system provides iOS-style widgets and styling,
which is perfect for building apps that feel native on Apple devices.
与之前两个教程不同,
此应用使用 `CupertinoApp` 而非 `MaterialApp`。
Cupertino 设计系统提供 iOS 风格的 widget 和样式,
非常适合构建在 Apple 设备上具有原生体验的应用。
### 运行应用
In your terminal at the root of your Flutter app, run the following command:
在 Flutter 应用根目录的终端中,运行以下命令:
```console
$ flutter run -d chrome
```
The app builds and launches in a new instance of Chrome.
It displays "Hello Rolodex!" in the center of the screen.
应用会在新的 Chrome 实例中构建并启动。
它会在屏幕中央显示「Hello Rolodex!」。
### 创建数据模型
Before building the UI,
create the data structures and sample data that the app will use.
This section is lightly explained because it's not the focus of this tutorial.
在构建 UI 之前,
创建应用将使用的数据结构和示例数据。
本节仅作简要说明,因为不是本教程的重点。
#### 联系人数据
Create a new file, `lib/data/contact.dart`, and add the basic `Contact` class:
创建新文件 `lib/data/contact.dart`,并添加基本的 `Contact` 类:
```dart foldable
class Contact {
Contact({
required this.id,
required this.firstName,
this.middleName,
required this.lastName,
this.suffix,
});
final int id;
final String firstName;
final String lastName;
final String? middleName;
final String? suffix;
}
[* -
final johnAppleseed = Contact(id: 0, firstName: 'John', lastName: 'Appleseed');
final kateBell = Contact(id: 1, firstName: 'Kate', lastName: 'Bell');
final annaHaro = Contact(id: 2, firstName: 'Anna', lastName: 'Haro');
final danielHiggins = Contact(
id: 3,
firstName: 'Daniel',
lastName: 'Higgins',
suffix: 'Jr.',
);
final davidTaylor = Contact(id: 4, firstName: 'David', lastName: 'Taylor');
final hankZakroff = Contact(
id: 5,
firstName: 'Hank',
middleName: 'M.',
lastName: 'Zakroff',
);
final alexAnderson = Contact(id: 6, firstName: 'Alex', lastName: 'Anderson');
final benBrown = Contact(id: 7, firstName: 'Ben', lastName: 'Brown');
final carolCarter = Contact(id: 8, firstName: 'Carol', lastName: 'Carter');
final dianaDevito = Contact(id: 9, firstName: 'Diana', lastName: 'Devito');
final emilyEvans = Contact(id: 10, firstName: 'Emily', lastName: 'Evans');
final frankFisher = Contact(id: 11, firstName: 'Frank', lastName: 'Fisher');
final graceGreen = Contact(id: 12, firstName: 'Grace', lastName: 'Green');
final henryHall = Contact(id: 13, firstName: 'Henry', lastName: 'Hall');
final isaacIngram = Contact(id: 14, firstName: 'Isaac', lastName: 'Ingram');
final juliaJackson = Contact(id: 15, firstName: 'Julia', lastName: 'Jackson');
final kevinKelly = Contact(id: 16, firstName: 'Kevin', lastName: 'Kelly');
final lindaLewis = Contact(id: 17, firstName: 'Linda', lastName: 'Lewis');
final michaelMiller = Contact(id: 18, firstName: 'Michael', lastName: 'Miller');
final nancyNewman = Contact(id: 19, firstName: 'Nancy', lastName: 'Newman');
final oliverOwens = Contact(id: 20, firstName: 'Oliver', lastName: 'Owens');
final penelopeParker = Contact(
id: 21,
firstName: 'Penelope',
lastName: 'Parker',
);
final quentinQuinn = Contact(id: 22, firstName: 'Quentin', lastName: 'Quinn');
final rachelReed = Contact(id: 23, firstName: 'Rachel', lastName: 'Reed');
final samuelSmith = Contact(id: 24, firstName: 'Samuel', lastName: 'Smith');
final tessaTurner = Contact(id: 25, firstName: 'Tessa', lastName: 'Turner');
final umbertoUpton = Contact(id: 26, firstName: 'Umberto', lastName: 'Upton');
final victoriaVance = Contact(id: 27, firstName: 'Victoria', lastName: 'Vance');
final williamWilson = Contact(id: 28, firstName: 'William', lastName: 'Wilson');
final xavierXu = Contact(id: 29, firstName: 'Xavier', lastName: 'Xu');
final yasmineYoung = Contact(id: 30, firstName: 'Yasmine', lastName: 'Young');
final zacharyZimmerman = Contact(
id: 31,
firstName: 'Zachary',
lastName: 'Zimmerman',
);
final elizabethMJohnson = Contact(
id: 32,
firstName: 'Elizabeth',
middleName: 'M.',
lastName: 'Johnson',
);
final robertLWilliamsSr = Contact(
id: 33,
firstName: 'Robert',
middleName: 'L.',
lastName: 'Williams',
suffix: 'Sr.',
);
final margaretAnneDavis = Contact(
id: 34,
firstName: 'Margaret',
middleName: 'Anne',
lastName: 'Davis',
);
final williamJamesBrownIII = Contact(
id: 35,
firstName: 'William',
middleName: 'James',
lastName: 'Brown',
suffix: 'III',
);
final maryElizabethClark = Contact(
id: 36,
firstName: 'Mary',
middleName: 'Elizabeth',
lastName: 'Clark',
);
final drSarahWatson = Contact(
id: 37,
firstName: 'Dr. Sarah',
lastName: 'Watson',
);
final jamesRSmithEsq = Contact(
id: 38,
firstName: 'James',
middleName: 'R.',
lastName: 'Smith',
suffix: 'Esq.',
);
final mariaCruz = Contact(id: 39, firstName: 'Maria', lastName: 'Cruz');
final pierreMartin = Contact(id: 40, firstName: 'Pierre', lastName: 'Martin');
final yukiTanaka = Contact(id: 41, firstName: 'Yuki', lastName: 'Tanaka');
final hansSchmidt = Contact(id: 42, firstName: 'Hans', lastName: 'Schmidt');
final priyaPatel = Contact(id: 43, firstName: 'Priya', lastName: 'Patel');
final carlosGarcia = Contact(id: 44, firstName: 'Carlos', lastName: 'Garcia');
final ninaVolkova = Contact(id: 45, firstName: 'Nina', lastName: 'Volkova');
final jenniferAdams = Contact(id: 46, firstName: 'Jennifer', lastName: 'Adams');
final michaelBaker = Contact(id: 47, firstName: 'Michael', lastName: 'Baker');
final sarahCooper = Contact(id: 48, firstName: 'Sarah', lastName: 'Cooper');
final christopherDaniel = Contact(
id: 49,
firstName: 'Christopher',
lastName: 'Daniel',
);
final jessicaEdwards = Contact(
id: 50,
firstName: 'Jessica',
lastName: 'Edwards',
);
*]
[* -
final Set allContacts = {
johnAppleseed,
kateBell,
annaHaro,
danielHiggins,
davidTaylor,
hankZakroff,
alexAnderson,
benBrown,
carolCarter,
dianaDevito,
emilyEvans,
frankFisher,
graceGreen,
henryHall,
isaacIngram,
juliaJackson,
kevinKelly,
lindaLewis,
michaelMiller,
nancyNewman,
oliverOwens,
penelopeParker,
quentinQuinn,
rachelReed,
samuelSmith,
tessaTurner,
umbertoUpton,
victoriaVance,
williamWilson,
xavierXu,
yasmineYoung,
zacharyZimmerman,
elizabethMJohnson,
robertLWilliamsSr,
margaretAnneDavis,
williamJamesBrownIII,
maryElizabethClark,
drSarahWatson,
jamesRSmithEsq,
mariaCruz,
pierreMartin,
yukiTanaka,
hansSchmidt,
priyaPatel,
carlosGarcia,
ninaVolkova,
jenniferAdams,
michaelBaker,
sarahCooper,
christopherDaniel,
jessicaEdwards,
};
*]
```
This sample data includes contacts with and without middle names and suffixes.
This gives you a variety of data to work with as you build the UI.
此示例数据包含带和不带中间名、后缀的联系人。
这为你构建 UI 时提供了多种数据可供使用。
#### ContactGroup 数据
Now, create the contact groups that organize your contacts into lists.
Create a new `lib/data/contact_group.dart` file and
add the `ContactGroup` class:
现在,创建将联系人组织成列表的分组。
创建新的 `lib/data/contact_group.dart` 文件并
添加 `ContactGroup` 类:
```dart
import 'dart:collection';
import 'package:flutter/cupertino.dart';
import 'contact.dart';
class ContactGroup {
factory ContactGroup({
required int id,
required String label,
bool permanent = false,
String? title,
List? contacts,
}) {
final contactsCopy = contacts ?? [];
_sortContacts(contactsCopy);
return ContactGroup._internal(
id: id,
label: label,
permanent: permanent,
title: title,
contacts: contactsCopy,
);
}
ContactGroup._internal({
required this.id,
required this.label,
this.permanent = false,
String? title,
List? contacts,
}) : title = title ?? label,
_contacts = contacts ?? const [];
final int id;
final bool permanent;
final String label;
final String title;
final List _contacts;
List get contacts => _contacts;
AlphabetizedContactMap get alphabetizedContacts {
final contactsMap = AlphabetizedContactMap();
for (final contact in _contacts) {
final lastInitial = contact.lastName[0].toUpperCase();
if (contactsMap.containsKey(lastInitial)) {
contactsMap[lastInitial]!.add(contact);
} else {
contactsMap[lastInitial] = [contact];
}
}
return contactsMap;
}
}
```
A `ContactGroup` represents a collection of contacts,
such as "All Contacts" or "Favorites".
`ContactGroup` 表示一组联系人,
例如「All Contacts」或「Favorites」。
Add the following helper code and sample data to `lib/data/contact_group.dart`:
将以下辅助代码和示例数据添加到 `lib/data/contact_group.dart`:
```dart
typedef AlphabetizedContactMap = SplayTreeMap>;
/// Sorts a list of [contacts] alphabetically by
/// last name, then first name, then middle name.
/// If names are identical, sorts by contact ID to ensure consistent ordering.
void _sortContacts(List contacts) {
contacts.sort((a, b) {
final checkLastName = a.lastName.compareTo(b.lastName);
if (checkLastName != 0) {
return checkLastName;
}
final checkFirstName = a.firstName.compareTo(b.firstName);
if (checkFirstName != 0) {
return checkFirstName;
}
if (a.middleName != null && b.middleName != null) {
final checkMiddleName = a.middleName!.compareTo(b.middleName!);
if (checkMiddleName != 0) {
return checkMiddleName;
}
} else if (a.middleName != null || b.middleName != null) {
return a.middleName != null ? 1 : -1;
}
// If both contacts have the exact same name, order by first created.
return a.id.compareTo(b.id);
});
}
final allPhone = ContactGroup(
id: 0,
permanent: true,
label: 'All iPhone',
title: 'iPhone',
contacts: allContacts.toList(),
);
final friends = ContactGroup(
id: 1,
label: 'Friends',
contacts: [allContacts.elementAt(3)],
);
final work = ContactGroup(id: 2, label: 'Work');
List generateSeedData() {
return [allPhone, friends, work];
}
```
This code creates three sample groups and a function to
generate the initial data for the app.
此代码创建三个示例分组和一个函数,用于
生成应用的初始数据。
Finally, add a class that manages state changes to `lib/data/contact_group.dart`:
最后,在 `lib/data/contact_group.dart` 中添加管理状态变化的类:
```dart
class ContactGroupsModel {
ContactGroupsModel() : _listsNotifier = ValueNotifier(generateSeedData());
final ValueNotifier> _listsNotifier;
ValueNotifier> get listsNotifier => _listsNotifier;
List get lists => _listsNotifier.value;
ContactGroup findContactList(int id) {
return lists[id];
}
void dispose() {
_listsNotifier.dispose();
}
}
```
If you aren't familiar with `ValueNotifier`,
you should complete the [previous tutorial covering state][] before continuing,
which covers state management.
如果你不熟悉 `ValueNotifier`,
应先完成 [涵盖状态的上一篇教程][previous tutorial covering state] 再继续,
该教程涵盖状态管理。
[previous tutorial covering state]: /learn/pathway/tutorial/set-up-state-project
### 将数据连接到应用
Update your `main.dart` to include the global state and
import the new data file:
更新 `main.dart` 以包含全局状态并
导入新的数据文件:
```dart
import 'package:flutter/cupertino.dart';
import 'data/contact_group.dart';
final contactGroupsModel = ContactGroupsModel();
void main() {
runApp(const RolodexApp());
}
class RolodexApp extends StatelessWidget {
const RolodexApp({super.key});
@override
Widget build(BuildContext context) {
return const CupertinoApp(
title: 'Rolodex',
theme: CupertinoThemeData(
barBackgroundColor: CupertinoDynamicColor.withBrightness(
color: Color(0xFFF9F9F9),
darkColor: Color(0xFF1D1D1D),
),
),
home: CupertinoPageScaffold(child: Center(child: Text('Hello Rolodex!'))),
);
}
}
```
With all the extraneous code out of the way, in the next lesson,
you'll start building the app in earnest.
清理完所有多余代码后,在下一课中,
你将正式开始构建应用。
[`cupertino_icons` package]: https://pub-web.flutter-io.cn/packages/cupertino_icons
### 回顾
title: 你完成的内容
subtitle: 以下是你本课构建与学习内容的摘要。
completed: true
items:
- title: 预览了 Rolodex 应用
icon: preview
details: >-
你正在开始一个专注于高级 UI 特性的新教程章节。
为了让应用在任何设备上都感觉精致且原生,
你将学习自适应布局、sliver、导航和主题。
- title: 使用 Cupertino widget 搭建了项目
icon: phone_iphone
details: >-
与之前的课程不同,
此应用使用 `CupertinoApp` 而非 `MaterialApp`。
Cupertino 设计系统提供在 Apple 设备上
具有原生体验的 iOS 风格 widget。
- title: 为联系人和分组创建了数据模型
icon: data_object
details: >-
你创建了带示例数据的 `Contact` 和 `ContactGroup` 类,
以及用于状态管理的 `ContactGroupsModel`。
这一基础将支持你在后续课程中构建的 UI。
### 自测
- question: CupertinoApp 与 MaterialApp 的主要区别是什么?
options:
- text: CupertinoApp 只能在 iOS 设备上运行。
correct: false
explanation: CupertinoApp 可在任何平台上运行;它只是提供 iOS 风格的 widget。
- text: CupertinoApp 提供 iOS 风格的 widget 和样式,而 MaterialApp 提供 Material Design widget。
correct: true
explanation: CupertinoApp 使用与 iOS 外观和体验相匹配的 Cupertino 设计系统 widget。
- text: CupertinoApp 更轻量且性能更好。
correct: false
explanation: 两者性能相近;区别在于视觉风格,而非速度。
- text: MaterialApp 需要更多配置才能搭建。
correct: false
explanation: 两者搭建要求相近;只是使用不同的设计系统。
- question: ValueNotifier 在状态管理中的作用是什么?
options:
- text: 验证用户输入值。
correct: false
explanation: ValueNotifier 持有值并在值变化时通知,而非用于验证。
- text: 持有一个值,并在该值变化时通知监听者。
correct: true
explanation: ValueNotifier 是一个简单的 ChangeNotifier,它包装单个值并在变化时通知监听者。
- text: 在不同数据类型之间转换值。
correct: false
explanation: 类型转换不是 ValueNotifier 的用途。
- text: 将值永久存储在本地存储中。
correct: false
explanation: ValueNotifier 在内存中持有值;持久化需要单独实现。